Windows 11 and Linux distributions can be run directly from your USB drive. Use this trick to avoid having to dual boot or uninstall systems constantly.
Dual-booting Windows and Linux is n’t a bad idea to get the best of both worlds, but it’s not the only thing you can do if you need to have multiple operating systems in one place .
Going through numerous installation processes is tedious, and having to wait to reinstall another OS when critical problems arise is very time-consuming. This is where the solution of using a USB drive that allows you to run multiple operating systems , all in one place, comes in.
If you’ve done any research on the subject, you’ve probably read something about Ventoy , a tool that offers this advantage of creating a “multi-system” space.
It’s an amazing option and many recommend it, but if you want to go further, have broad compatibility and be able to use other functions, it’s time for you to get to know Easy2Boot .
What is Easy2Boot and why should you use it?
Easy2Boot is a tool for creating multi-boot USB drives, similar to what you can do with Rufus , but instead of attaching a single operating system to the flash drive or external hard drive , it does so with several.
Unlike other similar programs, it stands out because it allows you to have dozens of operating system images from different environments . This means you could have Windows 11, macOS, and Linux distributions like Ubuntu, Zorin OS, Linux Mint, and Fedora all on a single drive.
With this capability, you avoid having to install multiple environments all the time and you have a backup in case the current one suddenly stops working and you have to start another one.
Also known as E2B, it was developed by programmer Steve Smith and released around 2013. It has gradually evolved to become one of the best in its class. More specifically, it offers all these advantages:
- Compatibility: It boasts greater file compatibility compared to others like Ventoy. For example, it can use system images such as ISO, VHD, VHDX, WIM, EFI, and IMG. It is also compatible with other bootloaders: grubfm, grub4dos, and Ventoy.
- Boot advantages: It incorporates a dual partition to provide an extra UEFI partition and compatibility with modern/legacy booting, along with files such as grub-2 agFM if the use of newer or more complex systems is required.
- Drivers: Snappy Driver Installer Origins tool to facilitate the installation of very old OS drivers.
In addition, there are other features such as the option to test environments with QEMU and the protection of ISOs in case of UEFI problems.
As if that weren’t enough, it also has customization and upgrade options that will definitely improve your experience if you’re interested in the aesthetics and stability of multiboot.
Basically, they are pure benefits that help save time by not having to reformat and having unattended installations (at least for Windows).

How to install and use Easy2Boot to create a multi-boot system on your USB drive
It’s true that Easy2Boot has a somewhat outdated interface, which might make it seem complex to use, but it’s actually quite intuitive once you learn the necessary steps and offers additional features that could be useful.
To begin, you need to install the software, which you can download from the official Downloads page . Before proceeding, it’s recommended that you have a high-capacity USB drive so you can install as many operating systems as you like.
For example, a USB drive between 32 GB and 512 GB , depending on your needs. It will be formatted, so make sure you don’t have anything important on it. Now, connect it to your PC and run the Easy2Boot installer, clicking the Next button until the extraction interface appears.
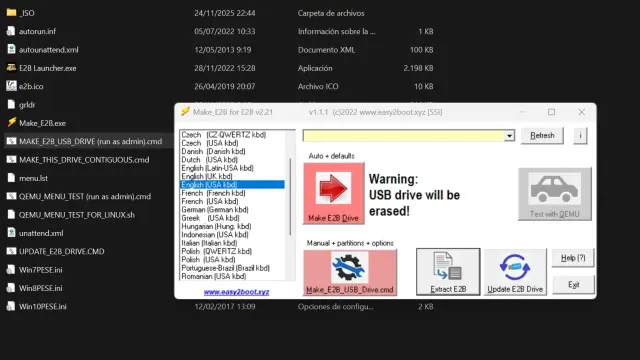
At this point, the files should appear in the folder you selected. Go to that folder, “Easy2Boot_v” , and run the file “MAKE_E2B_USB_DRIVE.cmd” . This will open the Command Prompt console, and you need to follow the steps to choose your USB drive and format it as NTFS or FAT32. Wait for the installation to complete.
What you need to do now is download the images of the systems you want to integrate, copy and paste them into the corresponding folders on the USB drive (you will have a list with the name of each system and the required version in the ISO folder).
The program detects them automatically, so you won’t need to configure anything else, which is another advantage. As for booting, it’s done like any other bootable drive: you connect the USB, restart, and choose the operating system.